

How to Take a Screenshot on iPhone (Guide)
Whether you want to create a more interactive presentation, make a easily-on guide, or share something with your friends or loved ones, screenshots come in super handy. Even though it's expressionless simple to take a screenshot on iPhone, non anybody may exist enlightened of it. Especially those who accept merely switched from Android to iOS. If yous are ane of them wondering how screen-grabbing works on iOS, let me tell you that there are 6 quick ways to capture a screenshot on iPhone.
9 Means to Capture a Screenshot on iPhone (2022)
The procedure of snapping screenshots varies based on iPhone models. Notably, there are iii dissimilar button combinations for capturing screenshots. As for the software methods, they are slightly under the wraps and likewise crave a bit of setup upfront. For times when the physical buttons practice not work properly or you don't notice it convenient to deal with the buttons, the software tricks can make your life smooth sailing. Autonomously from mentioning all the possible ways of capturing screenshots, we've also talked about the tips for taking scrolling screenshots on iPhone and editing them to your heart's liking. With that in mind, it'southward time to dive straight into the quick steps!
Take a Screenshot on iPhone Models with Face ID
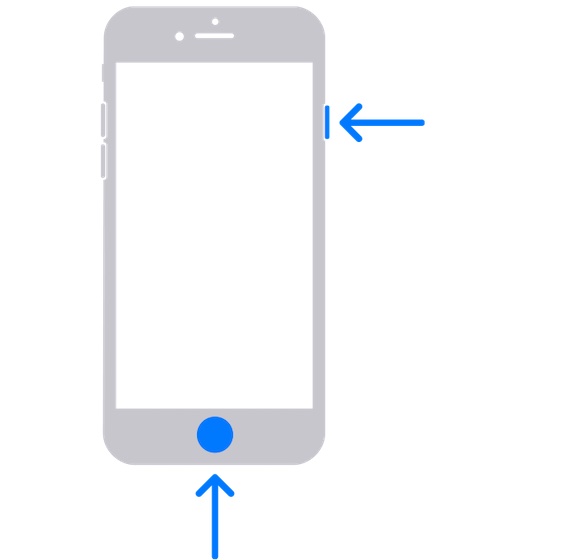
Apple has slightly tweaked the process of capturing screenshots on iPhone models with Confront ID such as iPhone X, XS, XS Max, XR, xi, xi Pro, 11 Pro Max, 12, 12 mini, 12 Pro, 12 Pro Max, xiii, 13 mini, 13 Pro, and xiii Pro Max. And so, if you take upgraded from classic iPhones to modern ones, the new button combination might crave a bit of time from you to get used to.
- Press the side button and the volume up button at once to take a screenshot on your Confront ID-equipped iPhones.

- One time you lot have snapped the screen, a thumbnail of the screenshot volition appear in the lower-left corner of the screen.
- You can now tap the thumbnail to open it or swipe left to dismiss it.
- To admission the screenshots, head over to Photos app -> Recents. Alternately, Photos app > Albums -> Screenshots.
Capture a Screenshot on iPhone Models with Touch ID and Side Push
Capturing a screenshot on iPhone models with Touch ID and side buttons such as iPhone 6, 6 Plus, 6s, 6s Plus, 7, vii Plus, 8, 8 Plus, and iPhone SE 2020 is only every bit simple.
- Printing the side push button and the home button at in one case to capture a screenshot on your iOS device.
- Afterwards yous take taken the screenshot, a thumbnail will testify upwardly at the bottom left corner of the screen.
- Tap the thumbnail of the screen to open it or swipe left on the thumbnail to dismiss it.
Have a Screenshot on iPhone Models with Touch ID and Top Button
If you have an iPhone model with Touch ID/Habitation and height buttons, yous can snap a screen with ease.
- Press the peak push button and the dwelling house push button at the same and then release both the buttons.
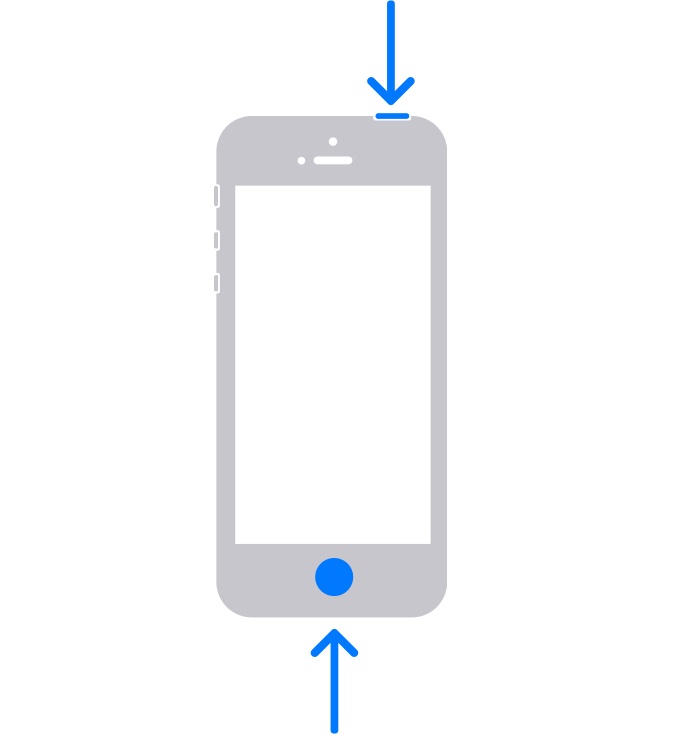
- Now, you should encounter the thumbnail of the screenshot in the lower-left corner of your screen. Hitting the thumbnail to open it or swipe left to dismiss information technology.
Take Screenshot on iPhone without Buttons
AssistiveTouch has long been a useful Accessibility feature that lets yous perform several common actions like restarting the iPhone, activating Reachability, taking a screenshot on iPhone without buttons, and more. Though it's designed keeping in mind people with motor skill impairments, anyone can have advantage of it to perform certain tasks without using the hardware buttons.
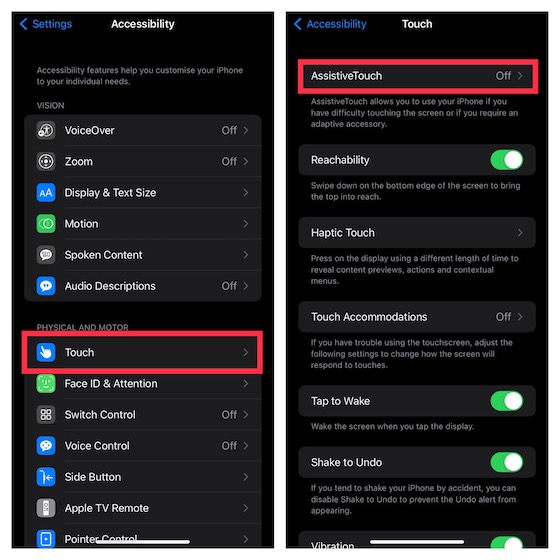
one. Head over to the Settings app on your iPhone and choose Accessibility.
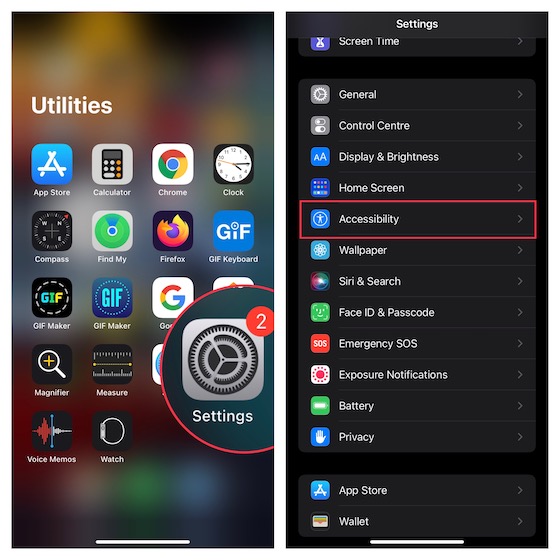
2. Now, tap Bear upon and select AssistiveTouch.
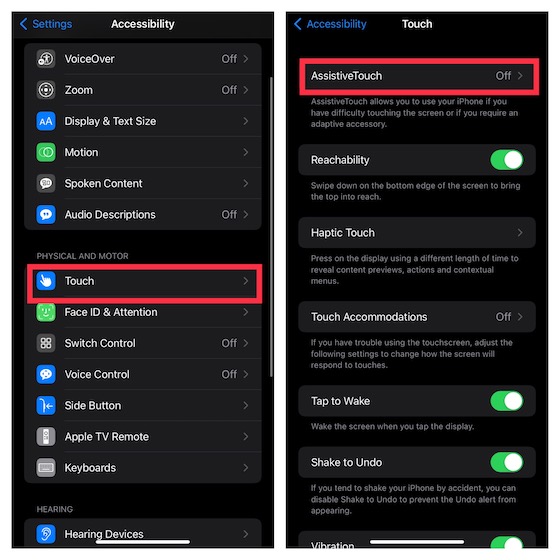
3. Turn on the toggle side by side to AssistiveTouch. Then, tap the Single-Tap pick located under the Custom Actions section and choose Open up Menu.
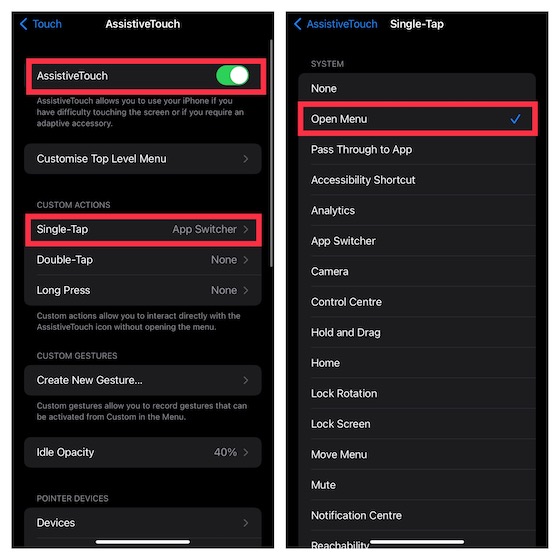
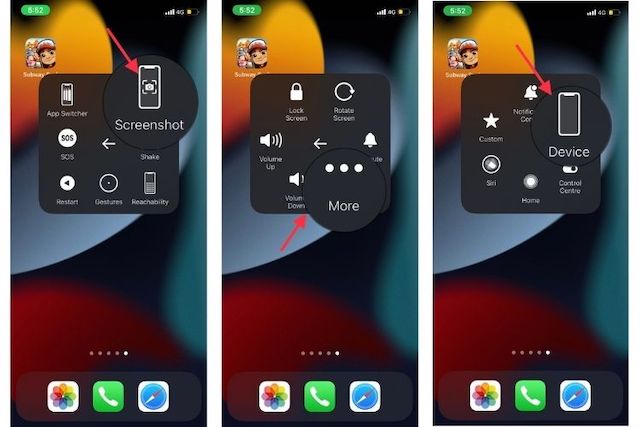
iv. Now, tap the AssistiveTouch icon -> Device -> More -> hit Screenshot and you are good to go!
Yeah, that'south how easy it is to snap a screen using AssistiveTouch. In one case you lot have enabled this noted Accessibility feature, taking a screenshot on iPhone without using physical buttons becomes plainly sailing.
Capture Screenshot on iPhone With Just a Tap
If yous want to become the nearly out of AssistiveTouch, you would be glad to that information technology can let you snap a screen on your iPhone with simply a quick tap. But there is i downside you lot demand to go on in mind. For this functionality, you lot will need to turn the AssistiveTouch into a dedicated screenshot tool. That means y'all can't use this Accessibility characteristic for other actions.
So, if you want a corking screenshot push button that you lot can use to capture a screen quickly, this hack is for you lot.
1. Navigate to the Settings app on your iPhone -> Accessibility -> Touch -> AssistiveTouch and and so plough on the toggle.
ii. At present, tap the Single-Tap activeness located under the Custom Actions department and choose Screenshot.
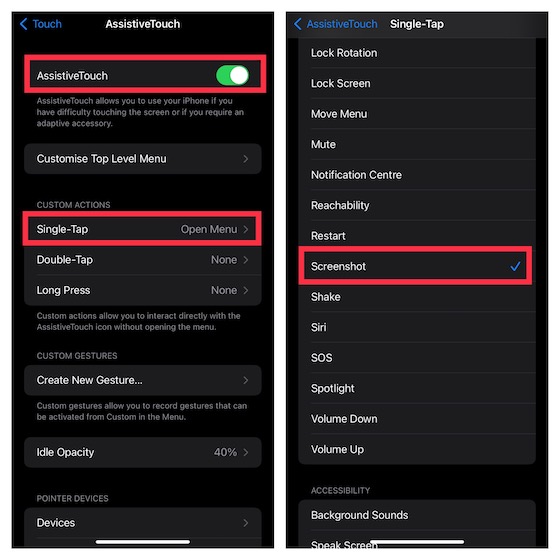
That's done! From now onwards, all you lot need to do to capture a screen on your iOS device is to hitting the AssistiveTouch icon. Pretty handy, isn't it? Have a look at the GIF beneath!
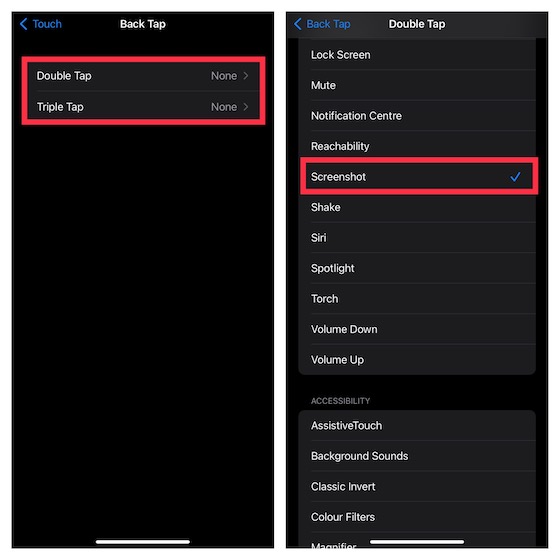
Take a Screenshot on iPhone With Back Tap Feature
Commencement introduced in iOS fourteen, the Back Tap characteristic is designed to let you perform many common tasks such as launching apps, invoking Siri, bringing up Notification Eye, and even capturing screenshots on iPhone with double-tap or triple-tap gestures. Do note that Back Tap supports just iPhone 8 or later on.
1. Head into the Settings app on iPhone –> Accessibility -> Touch. Now, gyre down to the lesser and choose Back Tap.
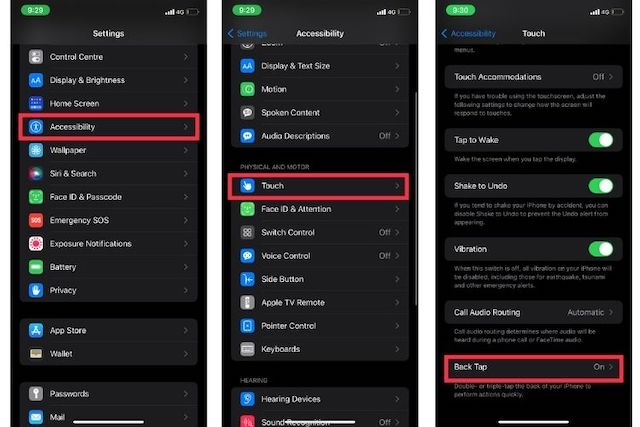
2. Next, choose Double Tap or Triple Tap and choose Screenshot.
Going forward, you lot tin can double/triple tap on the dorsum of your iPhone to capture a screenshot.
Take an iPhone Screenshot with Your Voice
Apart from letting y'all command your smart habitation devices and respond queries, Siri can also permit y'all take a screenshot on your iPhone. So, if you ever wish to grab a screen, invoke Siri and say something like, "Accept a screenshot". The virtual assistant will instantly snap the screen.

Take Scrolling Screenshots on iPhone (iOS)
iOS comes with a subconscious tool that can let y'all take a scrolling screenshot on your iPhone. For those unaware, scrolling screenshots consist of multiple screens of images/text that appears in a single frame, thereby making it more convenient for yous to curlicue through them. It tin come in pretty handy in multiple situations like sharing an unabridged article, sending a long Twitter thread to your friend, saving your flight ticket every bit a PDF, or even sharing a lengthy presentation.
Many built-in iOS apps such as Safari, Notes, Pages, and Keynote support scrolling screenshots. As for the process, information technology's expressionless simple and the steps are the same in all the compatible apps. I'chiliad going to show you lot how it works using Safari.
1. Open Safari on your iPhone and then head over to the page you want to capture.
ii. Now, take a screenshot using the concrete buttons or the software methods mentioned above. Subsequently that, tap Full Page at the peak of the screenshot. Adjacent, scroll through the page that you would like to capture and then drag the highlighted box to select the desired portion.
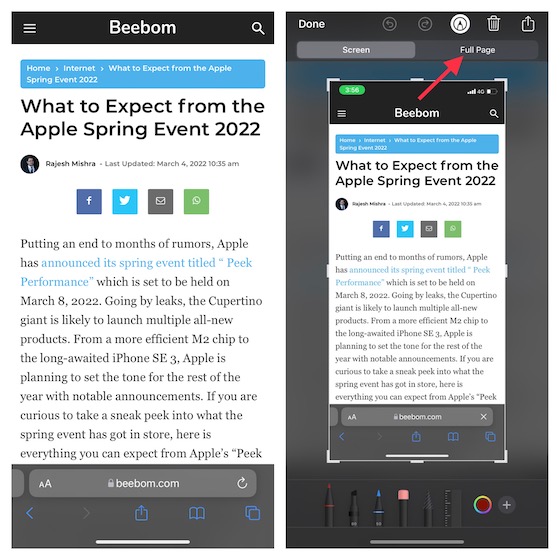
iii. Next upward, tap Done at the peak left corner of the screen and choose the "Save to Files" option in the popup. After that, relieve the file to the preferred location.

Use Third-Party Apps to Capture Scrolling Screenshots on iPhone
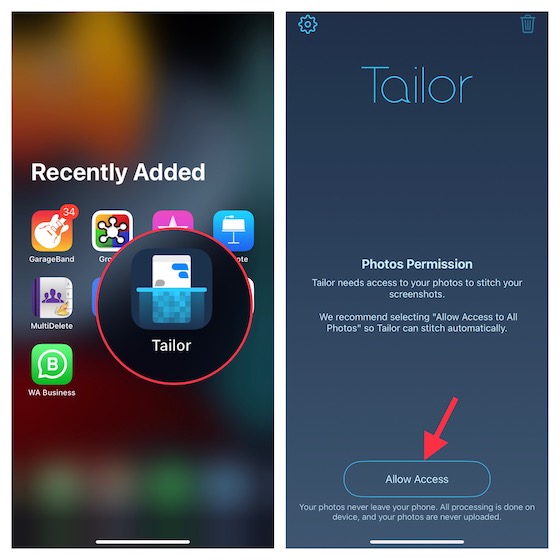
If you demand more transmission control for taking scrolling screenshots on iOS, I would recommend you cheque out Picsew (free, in-app purchases) or Tailor (gratuitous, in-app purchases). They are easy to utilize and permit to snap scrolling screenshots with the desired control. Though steps are almost the same for both apps, I'thou going to walk you lot through the steps using Tailor.
- Open up the Tailor app, and permit the app to admission your Photos app. Make sure to allow information technology access all of your photos then that information technology can run up them all without whatever hindrance.
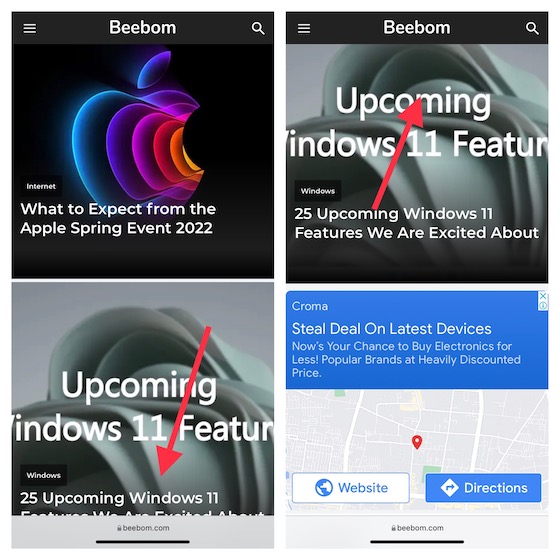
ii. At present, head over to the content that you desire to share and then take overlapping screenshots. With an overlapping screenshot, I mean keeping the finish of the starting time screenshot at the start of the 2nd to assistance the app merge them.
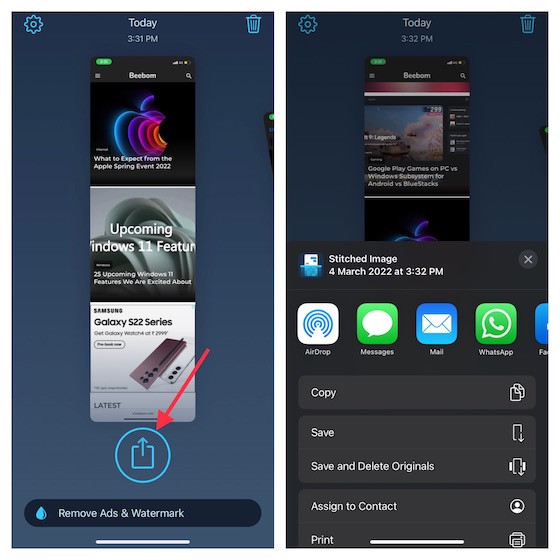
3. Next, launch Tailor, and the app volition automatically recognize the screenshots and stitch them into a long screenshot. Later that, tap the Share button and and so either save it to the desired location or share it with friends using a preferred app.
How to Edit Screenshots on iPhone
iOS comes with a ton of handy tools to allow y'all edit your screenshots. For example, yous can add a signature, take advantage of a magnifier to highlight certain parts, suit opacity, or even scribble on the screenshot.
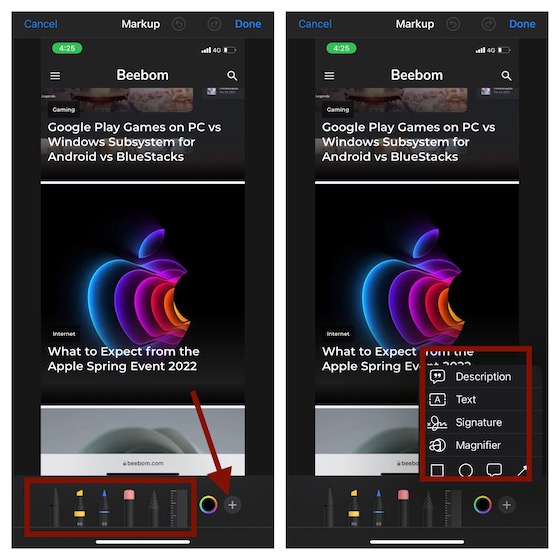
1. Once y'all accept captured the screenshot, tap on the thumbnail to access the editing tools. Alternately, navigate to the Photos app -> Albumps -> Screenshots to detect the screenshot that y'all want to edit. Then, tap the Edit push button at the top right and hitting the Markup icon.
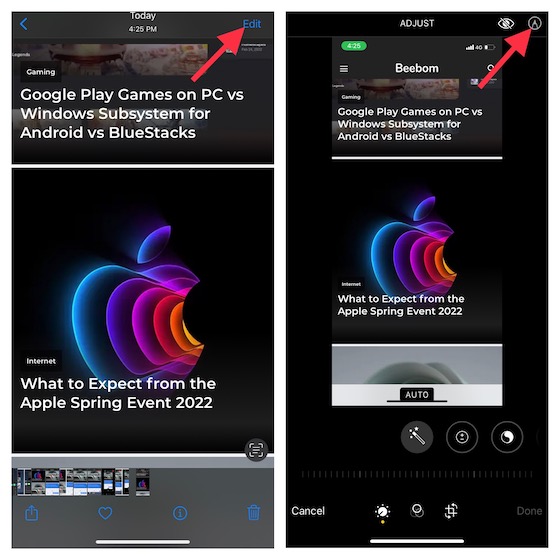
2. Now, you employ a variety of pencils to scribble on your screenshot. To add clarification, text, signature, or magnify specific parts, tap the "+" push at the bottom right corner of the screen and then select the preferred option.
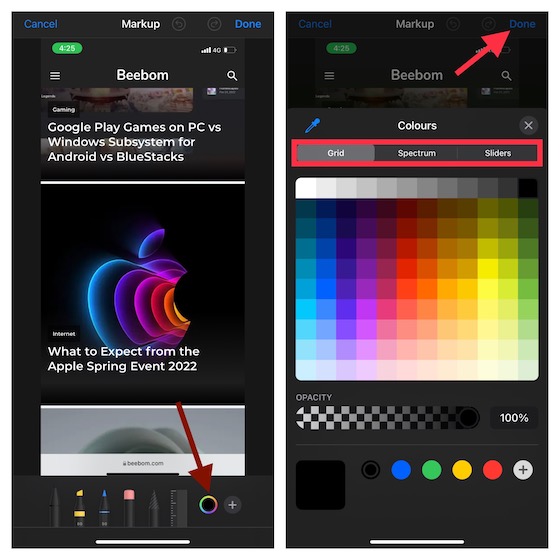
3. To fine-tune colors, tap the colors icon at the bottom and so customize the grid, spectrum, or sliders every bit per your needs. In the finish, make sure to tap Done at the elevation right to confirm the changes.
Elevate and Drop Screenshots on iPhone
With iOS fifteen, you tin can elevate and drop images and text across apps. Fifty-fifty though cross-app drag and drib has existed on iPad since 2017, Apple tree has introduced it in the latest iteration of iOS to let you move files and images from i identify to some other with ease.
1. After you take captured a screenshot, printing and agree the screenshot thumbnail in the lesser left corner of the screen.
ii. Make sure to press and concur the screenshot until the white frame around it disappears. After that, use another finger to tap the app you want to drop the screenshot in. Then, drop the image to the desired location.
It's worth noting that we've created a separate guide on how the cross-app elevate and drop works in iOS 15. Exist certain to check that out if you want to become the most out of this nifty hack.
Easily Have Screenshots on iPhone
In that location y'all go! And so, these are the quick ways to capture a screenshot on iOS device. With multiple hardware and software tricks at hand, y'all tin cull a preferred method depending on your needs. Personally, I adopt the AssistiveTouch's one-tap trick of capturing screenshots. It's faster and more than convenient. Since this Accessibility feature has been available even on older iOS versions including iOS 15, y'all can utilise it on well-nigh any iPhone and iPad model. By the mode, which is your favorite fashion of taking screenshots? Make certain to share your feedback in the comments section beneath.

Source: https://beebom.com/take-screenshot-iphone/
Posted by: neelearon1961.blogspot.com
0 Response to "How to Take a Screenshot on iPhone (Guide)"
Post a Comment